Inspect Harness
100250-01
Use the following procedure to inspect the IPS harness.
Applicable Aircraft Serial Numbers
All
Type of Maintenance
Line
Level of Certification
LSA-RM
Task Specific Training Required
No
Special Tools Required
None
Parts Required
None
Aircraft System and Number
16—ICON Parachute System (IPS)
Safety Equipment
As Needed
Consumables
2X 004000-01 (BRS Zip Tie)
2X TYMX24 Zip Ties
Warning:
Do not “experiment” with the BRS Recovery System or fire it on the ground just to see if it works. People may be injured, property damaged, and thousands of dollars of expense will be incurred to repack the parachute and recharge the rocket. In addition, firing the BRS Recovery System experimentally will render it and the aircraft unusable until the factory has serviced it. Treat the BRS Recovery System like a loaded gun. Verify the “REMOVE BEFORE FLIGHT” pin is installed.
Note:
Throughout the process, take photos as required in BRS Installation Manual (020060-PM). Contact customer advocates to send photos to ICON. Steps requiring photos will be indicated.
Task Instructions
2. Inspect the visible parts of the three harnesses remaining in the aircraft. See Figure 539 for mounting locations.
a. Inspect the harness bridal for excessive wear or tears. The sheathing may have light wear, but excessive fraying is unacceptable, and the underlying Kevlar bridal (tan in color) must not be exposed.
b. Inspect the harness inside the intake shroud with a mirror or borescope for excessive wear or tears. Wear points on the bridal inside the intake shroud be investigated further with mirrors or a borescope to determine to cause of wear. Wear may also indicate the harness was too slack inside the air intake shroud.
Figure 539. Parachute Harness Routing

3. Inspect S-Fold part of harness.
a. Secure two TYMX24 zip ties inboard of the existing BRS zip ties to retain the S-Fold pattern for the harness. Cut the two BRS zip ties securing the harness into the parachute bay.
b. Pull S-Fold of harness away from rear of parachute bay. Inspect for FOD and clean area.
c. Inspect the S-Fold by pulling the pleats apart gently to see between he fold in the webbing. Inspect carefully around the end of each fold for wear. If excessive wear is noticed, contact ICON Aircraft.
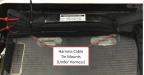
d. Reinstall harness into rear part of parachute bay. Loop two long BRS Zip Ties (004000-01) through tie mounts at bottom rear of parachute mount and around S-Fold of harness. Pull tight and flush, cut off the remaining tails of the BRS zip ties. Remove TYMX24 zip ties. See Figure 540.
Figure 540. Harness S-Fold Installation
Verification Task:
BRS Checklist PS.1-3 have been marked complete. (IPS Installation
Checklist)
Re-secure the harness using the special BRS zip ties.
If harness is free from wear, as described in Step 3, this task is complete. Continue to related tasks. If wear is detected, contact ICON Aircraft.
Parent topic