Replace Canopy Seal
100873-00
Use the following procedure to replace the main canopy seal.
Applicable Aircraft Serial Numbers
All
Type of Maintenance
Line
Level of Certification
LSA-RM
Task Specific Training Required
No
Special Tools Required
None
Parts Required
None
Aircraft System and Number
02—Doors and Windows
Safety Equipment
As Needed
Consumables
AC-111 (ADHESION PROMOTOR)
A-85 (ADHESIVE, URETHANE, HIGH STR, HARDMAN)
19 Feet ICA004396 (SEAL - PROFILE, CANOPY)
TT-I-735A or equivalent (ISOPROPYL ALCOHOL)
Task Instructions
1. Open canopy.
2. Mask the existing profile of the seal with masking tape on the outboard every 6 to 12 inches.
3. Using a plastic scraper, remove any leftover adhesive from the canopy.
4. Clean bonding surface with 50/50 mixture of isopropyl alcohol and water to remove any oil, grease, loose particles, etc.
a. Surface must be clean and dry before applying adhesion promoter.
5. Apply adhesion promoter to bonding surface per manufacturer's specification.
a. Apply a thin uniform coat of adhesion promoter using a dust free cloth that has been dampened with the adhesion promoter.
b. Wipe the surface leaving a clean wet surface.
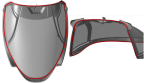
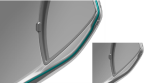
c. Allow solvent to flash off after application for one minute. Bonding surface is shown highlighted in red. Figure 43
Figure 43. Bonding Surface
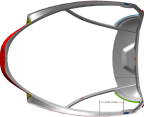
6. Measure 6-10 inches from the forward edge of the co-pilot canopy frame alignment pin receptacle. This will be the starting point of the main seal. Figure 44
Figure 44. Starting Point for Seal
7. Cut necessary length of main canopy seal. Trim starting end at 90°.
9. Bond adhesive-backed seal all around canopy frame.
Figure 45. Seal Routing
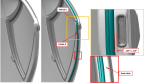
b. Route canopy seal around receptacle. Position seal to allow for .250 inches ± .125 inches inboard clearance from receptacle from point A to point B. Figure 46
Figure 46. Seal Routing
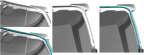
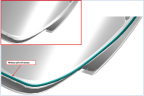
c. Continue to route seal along the canopy frame. Do not cover the drain hole on the canopy frame, route seal around inboard side of the drain hole as shown in Figure 47
Figure 47. Seal Routing
d. Route the canopy seal along the pilot-side half , mirroring the seal on the copilot side. Figure 48
Figure 48. Seal Route
10. Mix adhesive (A-85) per manufacturer's instructions. Use adhesive to bond miter joint splice of the two ends of the main canopy seal together.
11. Add additional seal sections as needed to seal the corners of the canopy at the top of the canopy as necessary.
12. Allow two hours for adhesive to reach full cure.
Verification Method
Verify canopy does not leak by performing water leak test.
Parent topic