Remove Parachute Without Replacing IPS Rocket
100771-01
Use the following tasks to remove the parachute installation if the rocket is not being replaced.
Applicable Aircraft Serial Numbers
All
Type of Maintenance
Line
Level of Certification
LSA-RM
Task Specific Training Required
Yes, contact ICON for rocket-specific training prior to performing any rocket-related portion of this task.
Special Tools Required
None
Parts Required
None
Aircraft System and Number
16—ICON Parachute System (IPS)
Safety Equipment
As Needed
Consumables
None
Task Instructions
2. Loosen fwd, smaller quick link (connecting the rocket collar to the parachute wire lanyards) and remove the two cables from the pickup collar. Do not remove any other cables. Temporarily close the quick link.
3. Undo the side pouch of the parachute bag and remove the cables. These cables are secured to the rocket which is staying in the aircraft.
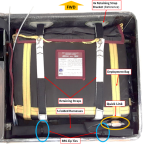
4. Loosen the aft, larger quick link, then use temporary zip ties and/or labels to mark harness “C” ends. These must be reinstalled in the same order and orientation later. Remove the three “C” ends that go to the S-fold harness from the large quick link. Leave the remaining parachute “C” end of the harness on the quick link. Close the quick link. It will be shipped with the parachute. Optional: secure/stow the quick link to the parachute bag using the Velcro tab. See Figure 533.
Figure 533. Rocket Subassembly and Installation to Rocket Mount Bracket

5. Peel the four hook and loop tabs to release retaining straps from the retaining strap brackets. Remove parachute and rocket collar from the parachute bay. Figure 534
Figure 534. Parachute Bag Installation
Verification Method
The procedure is complete when the parachute installation has been removed. If returning the parachute, See IPS Packing
List.
Parent topic