Replace Insulation on Muffler Fairing
100890-00
Use the following procedure to remove and replace the full insulation on the muffler fairing.
Applicable Aircraft Serial Numbers
All
Type of Maintenance
Line
Level of Certification
LSA-RM
Task Specific Training Required
No
Special Tools Required
None
Parts Required
See IPC Reference
Aircraft System and Number
08—Fuselage and Vertical Tail
Safety Equipment
As Needed
Consumables
ICA012078 (LUBRICANT, GENERAL PURPOSE) Tef-Gel
AC-111 (ADHESION PROMOTOR, AC-111)
TT-I-735A or equivalent (ISOPROPYL ALCOHOL)
IPC Reference
Task Instructions
1. Remove old insulation material. Use isopropyl alcohol to remove adhesive residue. Clean mating surface of fairing with mild soap and water solution and dry using lint-free cloth.
2. If required, trim insulation to fit muffler fairing.
3. Scuff surface of muffler shield with Scotchbrite to remove surface gloss. Wipe with isopropyl alcohol. Dry using lint-free cloth and let stand for 15 minutes.
4. Apply AC-111 adhesion promoter on the area where insulation will be installed. Let dry for two minutes.
5. Install pre-cut insulation material by centering into contour of muffler fairing and smoothing out the edges.
a. Remove backing before installation. Minimally handle adhesive side of insulation and apply with firm pressure when applying insulation to ensure insulation does not lift off the carbon surface.
b. It is acceptable to dart and trim excess material to achieve fit that will cover cowl.
c. The maximum allowable gap in part coverage is 0.062 inch.
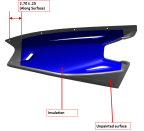
d. Place insulation within ± .25 inch of radius tangency.
Figure 232. Insulation Location, RH Shown
Verification Method
Insulation is secure and does not lift at the edges.
Parent topic